Watercolour – Paint, Paper and Brushes

Watercolour Painting art class – Still Life at Visualartscentre Singapore
Watercolour refers to a painting method that uses pigments that are suspended in water-based solutions, what makes watercolour different from most other paint mediums is the natural transparency of the paint when dissolved in water. This transparency give the paint a luminous glowing effect which enthrals many to the delicate art form. Today, we look at the different materials that are commonly used in watercolour painting.

Paints

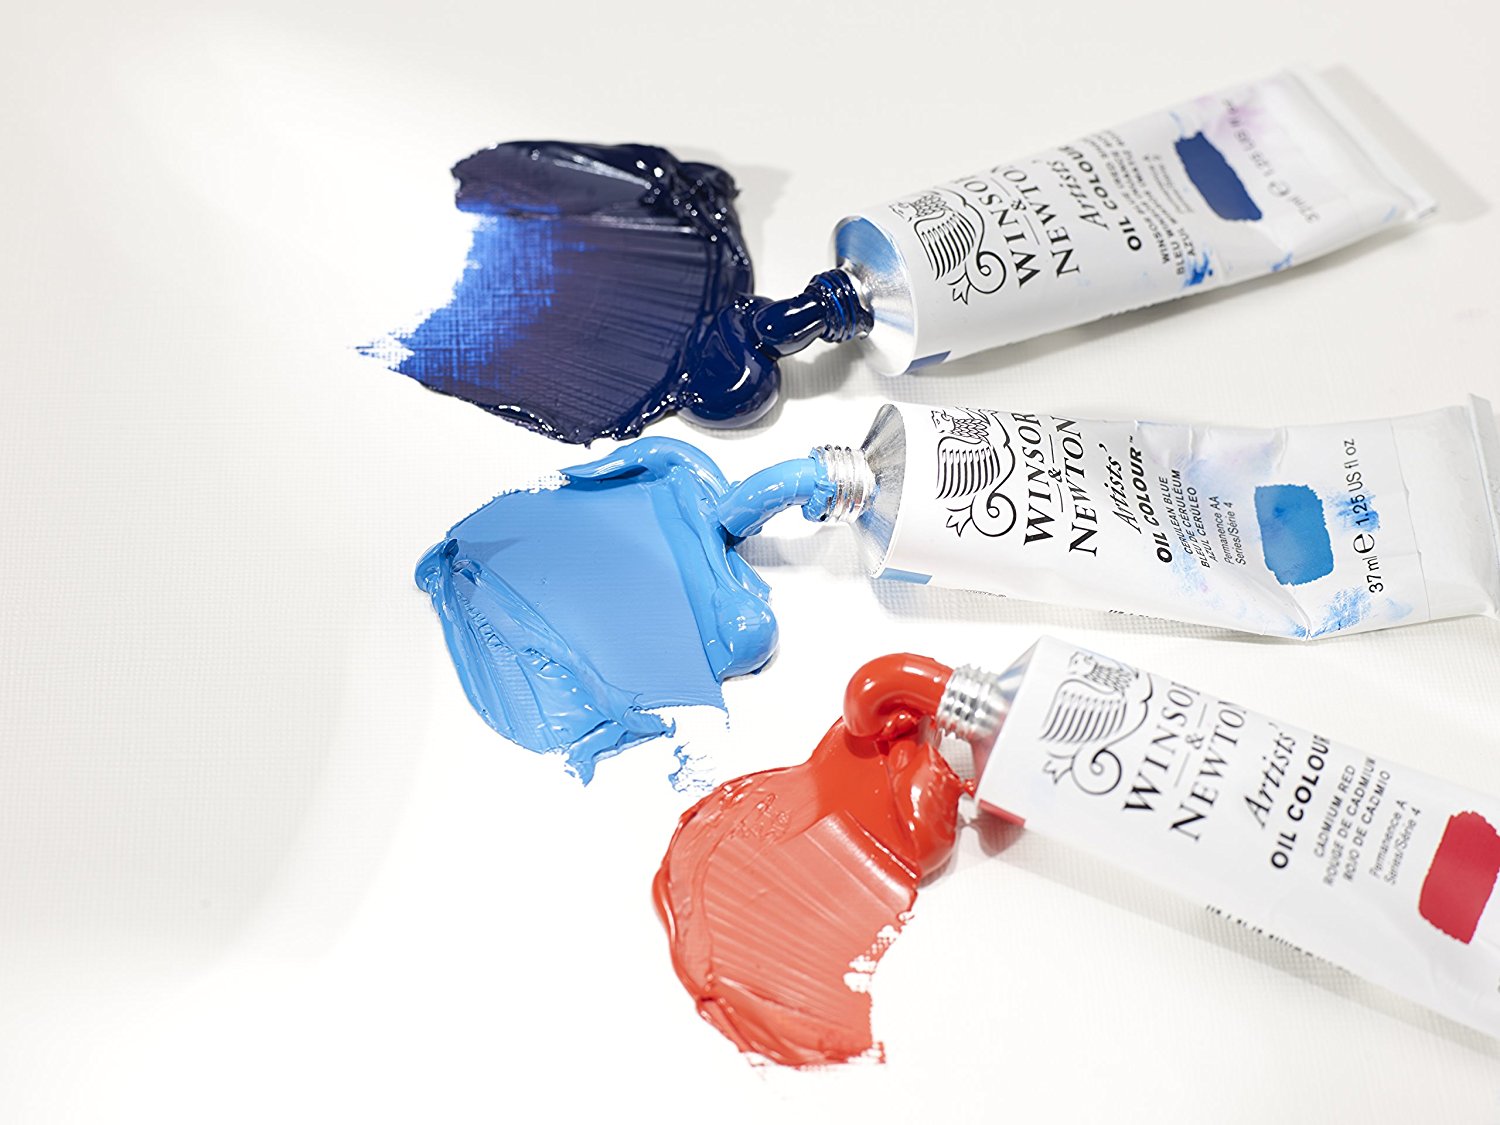
Watercolour paints most commonly come in two forms, pans and tubes.  Related image

Pans

Pans refer to solid blocks of paint that reactivate when they come into contact with water. Pans are recommended for outdoor settings where the solid state of the paint will be easier to handle and clean up considering the equipment restraints when painting outdoors. Pros
  • Easy to transport/ transfer, portable since its dry
  • Less risk of overloading brush with pigment/ picking up too much paint
  • One block lasts quite long
Cons
  • Difficult to prepare large amount of paint for washes
  • Troublesome to mix
Related image

Tubes

Tubes refer to paints in a paste form that are stored in tube packaging. Tubes of paint are recommended for studio settings where paintings tend to be bigger and hence require larger washes, a studio environment also gives you ample space and time to mix pigment colours. Most professionals use tube paints. Some artists like to squeeze their tube paints into a palette and use them like pan paints when the paste paints have dried. Pros
  • Easier to prepare large quantity of paint for washes
  • Easier to mix colours
Cons
  • Risk of squeezing out too much paint leads to wastage
  • Harder to rewet the paint, can only be done if paint dries in a convenient manner such as on a palette but the solid state of tube paints does not hold up as well as the pan paints.

Paper

The paper is extremely important in watercolour painting as the paint and water behave differently on different papers. It is important to find a paper type that suits your needs. What we especially want to look out for when selecting watercolour paper is the durability, normal paper will crinkle or flake when excessive water is applied, hence in watercolour painting where a lot of water is used, it is important that our paper does not crinkle or flake when a lot of water is used. Here we will talk about the production, surfaces and weights of watercolour papers.

Production

Production of watercolour paper is done through 3 common ways, handmade, mould-made and machine made.
  • Handmade
Handmade watercolour paper is made by pressing the pulp of cellulose fibres such as cotton,linen and hemp into sheets. Because of the tedious work and manpower involved, handmade paper is quite costly, however it is considered to have the best quality, the differences between different manufacturers also results in a wide range of handmade paper properties. Handmade watercolour paper is extremely durable and will not crinkle, additionally the textures are irregular due to the production process and hence attractive to many artists.
  • Mould-made
Mould-made paper as the name implies are made in moulds, the process gives the paper more uniformity than the handmade paper. Unlike the pure cellulose content of handmade paper, mould-made paper is usually made with a mix of cotton and paper fibres. The result is a paper that has the durability and feel of handmade paper but with more consistency in structure. The prices of mould-made paper also tend to be more affordable than handmade. This is what is usually reccomended for its quality and price.
  • Machine Made
This is the most affordable of all watercolour papers, it has a higher ratio of paper fibres to cotton fibres, cheaper variations use wood pulp which causes paper to yellow over time. Machine made papers are also less durable paper and you may risk breaks, flaking and crinkles. Image result for watercolour paper types

Surface

The surface of watercolour papers come in rough, hot pressed and cold pressed.
  • Rough- heavily textured in an irregular pattern
  • Hot-pressed-smooth, great for detailed work
  • Cold-pressed- texture is in-between rough and hot pressed, slightly textured

Weight

The weight of the paper affects how thick the paper is, there are many different weights of watercolour paper sold but these 2 are commonly used
  • 300gsm – needs to be stretched for heavy washes
  • 638gsm – more expensive but no stretching needed

Brushes

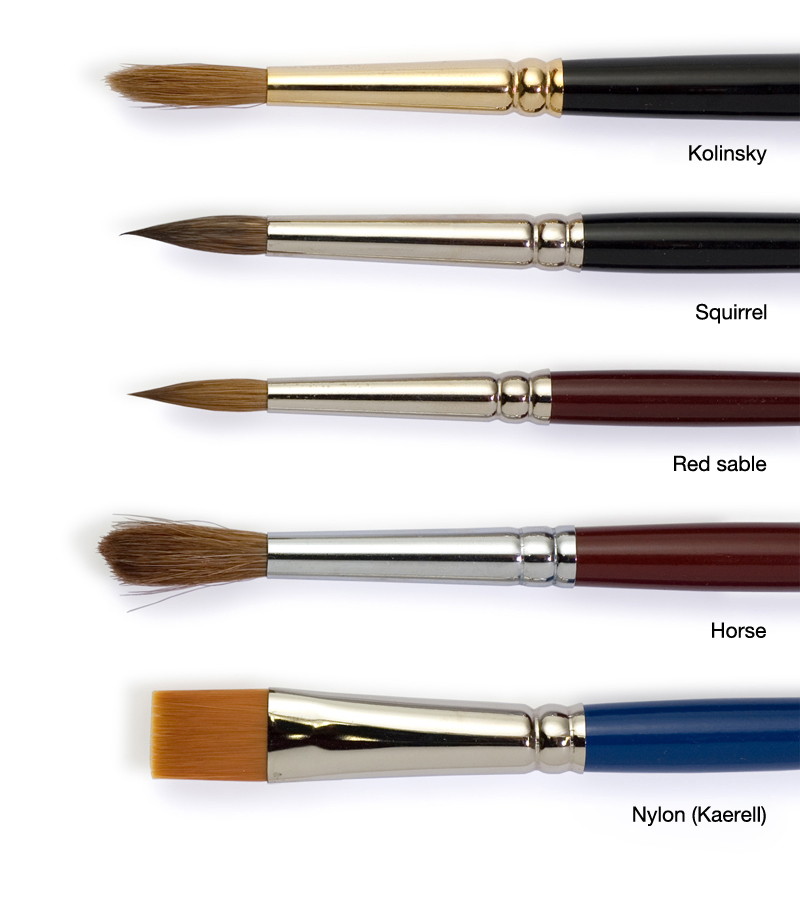
Watercolour brushes come in many different hair fibres and shapes, they all vary in purpose, price and quality. Watercolour brushes need to be able to hold a good amount of paint/water, distribute it evenly, maintain its shape after use and for some brushes, maintaining a fine point at the tip of the brush is important. Image result for paintbrush hair types

Hairs

  • Sable – considered to be the best for watercolour, with Kolinsky sable being the most sought after.
  • Squirrel,Ox & Goat– only recommended for wash brushes such as mop, wash and flat square brushed. Not recommended for round brushes due to inability to hold point tip.
  • Hog Bristle – Good for large wash brushes, can hold and distribute a lot of paint, affordable and durable
  • Synthetic – Affordable, varying quality but not as durable as sable. Generally acceptable for round brushes
Not recommended
  • Camel – not actually camel hair but other natural hair blends of inferior quality
  • Combination hairs – Synthetic with sable or other natural fibre, recommended that you research on each model and feel it first hand and quality can vary greatly between manufacturers.
  • Image result for watercolour brush types
    Image result for watercolour brush types

Shapes

  • Round – an essential in watercolour, the tip makes it good for fine lines and details but the body of the brush holds a lot of water making it good for broad strokes. Get a good round brush
  • Flat – For washes and thicker lines. You can save some money on this one but make sure its durable
  • Spotter and Rigger(liner) – for very small detailing and thin lines
  • Wash – Like a flat brush but bigger and wider, for applying very large washes
Here at Visual Arts Centre, all our materials are provided for our watercolour classes so fret not! Click to check out our Watercolour painting classes!

Our Schedule

VISUAL ART CENTRE DHOBY GHAUT STUDIO

CLASS SCHEDULE

Teen/Adult Class

Kids Class (5-7 YO)

Creative Junior Class (8-9 YO)

MON

11am -
1:15pm

5pm -
7:15pm

5pm -
7:15pm

(Digital/
Manga)*

7:30pm -
9:45pm

(Digital/
Manga)

5pm -
6:30pm

TUE

3:30pm -
5:45pm

3:30pm -
5:45pm

3:30pm -
5pm

(KIDS)

4:30pm -
6pm

(KIDS)

3:30pm -
5pm

WED

11am -
1:15pm

1:30pm -
3:45pm

5pm -
7:15pm

7:30pm -
9:45pm

(Chinese Ink
Painting)

5pm -
6:30pm

THU

1pm -
3:15pm

3:30pm -
5:45pm

(Digital/
Manga)

7:30pm - 10pm

(Nude Life/ Portrait)

3:30pm -
5pm

FRI

11am -
1:15pm

5pm -
7:15pm

7:30pm -
9:45pm


5pm -
6:30pm

SAT

10:30am -
12:45pm

1pm -
3:15pm

3:30pm -
5:45pm

6:30pm -
8:45pm


SUN

10:30am -
12:45pm

11:15am -
12:45pm

(KIDS)

1pm -
3:15pm

3:30pm -
5:45pm

6pm -
8:15pm

*TO BE ENQUIRED

Call/WhatsApp: +65-6255-0711 E: info@visualartscentre.sg

MacPherson Art Studio

Call/WhatsApp: +65-6255-0711

E: info@visualartscentre.sg

CLASS SCHEDULE

140 Paya Lebar Rd, 03-04 AZ @Paya Lebar Building, S(409015)

Contact us for any enquiries!

Our Location

Dhoby Ghaut Art Studio

Dhoby Ghaut Art Studio​

Address:

10 Penang Road, #01-02 Dhoby Ghaut Green,
Singapore 238469

Exit from Dhoby Ghaut MRT Station Exit B and turn left, we are there in 30m!

MacPherson Art Studio

Visual arts Centre Macpherson kids holiday, space for hire, venue hire for exhibition gallery, top central venue for rent in Singapore, Visual Arts Centre

Address:

AZ@Paya Lebar, 140 Paya Lebar Road, #03-04,
Singapore 409105

Exit from Macpherson MRT Station Exit A and turn left, we are right across the road, 1 minute walk away!

Leave us a message!

Have any questions? Please drop us an enquiry form and we’ll respond to you as soon as we can!

"*" indicates required fields

Name
This field is for validation purposes and should be left unchanged.

Foundation In Digital Art

Embark on a captivating journey into the vibrant world of digital art! Our Foundation in Digital Art workshop invites budding creatives aged nine and above to unleash their imagination and hone their artistic skills in a dynamic, supportive environment. From mastering basic digital tools to crafting mesmerizing digital masterpieces, children will explore a spectrum of techniques guided by seasoned mentors. Through hands-on activities and interactive sessions, participants will discover the endless possibilities of digital expression while fostering creativity and critical thinking. Join us for an exhilarating adventure where young artists transform ideas into stunning visual realities, igniting a passion for digital art

Colour & Texture Exploration With Acrylic Painting & Collage

Prepare to unleash your inner artist in a kaleidoscope of color and creativity with ‘Colour Blast: Acrylic Painting & Collage Techniques’! Dive into a whirlwind adventure where vibrant hues and mesmerizing textures collide in a symphony of imagination. From mastering the art of seamless color blending to discovering the magic of mixed media collage, this journey is a playground for your artistic soul. With each brushstroke, explore new techniques that breathe life into your canvas, transforming it into a vibrant tapestry of expression. Join us and let your creativity run wild as you embark on this colorful escapade!”

World of Manga [Foundation & Styling]

A manga art workshop for children and teenagers sounds like a fantastic idea! Here’s how you might structure it:
Introduction to Manga: Begin by introducing what manga is, its history, and its influence on popular culture worldwide. Show examples of different manga styles and genres to give participants an overview.
Basic Drawing Techniques: Start with the fundamentals of drawing, such as line work, shapes, and proportions. Provide step-by-step instructions on how to draw basic manga characters, focusing on simple shapes that can be built upon.
Character Design: Move on to character design concepts, including creating unique characters, designing their personalities, and developing backstories. Encourage participants to get creative and think outside the box.
Expression and Emotion: Teach how to convey emotions and expressions through facial expressions, body language, and positioning of characters. This can be a fun and interactive exercise where participants practice drawing various emotions.
Storytelling and Paneling: Explore the basics of storytelling in manga, including paneling techniques, pacing, and layout. Show examples of different panel structures and discuss how they affect the flow of the story.
Inking and Coloring: Introduce participants to inking techniques using pens or markers. You can also cover digital inking for those interested. Then, demonstrate basic coloring techniques using markers, colored pencils, or digital software.
Feedback and Collaboration: Provide opportunities for participants to share their work and receive feedback from their peers and instructors. Encourage collaboration by having them work together on short manga projects or collaborative drawings.
Final Showcase: End the workshop with a showcase of participants’ work. This could be in the form of an exhibition, digital gallery, or printed booklet. Celebrate everyone’s creativity and progress throughout the workshop.
Remember to create a supportive and encouraging environment where participants feel free to express themselves and explore their creativity. And don’t forget to have fun! Manga is all about imagination and passion, so let that spirit shine through in your workshop.

Academy Drawing Traditions

The academy drawing and sketching tradition, rooted in centuries of artistic practice, emphasizes disciplined study of form, proportion, and technique. Originating from Renaissance workshops and formalized by institutions like the Royal Academy, it prioritizes meticulous observation and mastery of fundamental skills. Students progress from basic exercises to complex compositions, learning to depict still life and common objects with precision and expression. This tradition values both classical principles and innovation, encouraging artists to push boundaries while maintaining a deep respect for tradition. Through rigorous training and critique, artists within this tradition cultivate a strong foundation for creative exploration and artistic excellence.

Chinese Ink Painting and Calligraphy

This course on Chinese ink painting and calligraphy introduces young learners to the rich traditions of Chinese art. Through hands-on activities, students explore the basics of brush techniques, ink control, and the delicate art of Chinese script. They learn to appreciate the cultural significance of calligraphy and painting, developing skills in creating elegant strokes and expressive brushwork. The course fosters creativity, patience, and fine motor skills, while also providing insights into Chinese history and aesthetics. By the end, children gain confidence in their artistic abilities and a deeper understanding of Chinese cultural heritage.

Funk with Graffiti

Funk With Graffiti Workshop for children is an engaging and creative program aimed at introducing young artists to the vibrant world of graffiti and funk-inspired street style art. Participants learn the basics of graffiti history, techniques, and safety. Guided by professional graffiti artists, children explore the art of designing their unique tags, emphasizing creativity, expression, and individuality. The workshop includes hands-on activities, from sketching concepts to creating final designs with spray paint on provided surfaces. By the end of the session, children gain confidence in their artistic abilities and an appreciation for graffiti and funk as legitimate forms of street art. Each child completes two original artworks, which they proudly take home, showcasing their newfound skills and personal style.

Batik Tales

In the Batik Introduction Handkerchief Painting workshop, participants will learn the traditional art of batik, a wax-resist dyeing technique originating from Indonesia. The workshop begins with a brief history and overview of batik, highlighting its cultural significance and various techniques. Participants will then observe a demonstration of applying wax with tjanting tools and dyeing the fabric. Following the demonstration, each participant will design and create their own batik handkerchief, applying wax to create patterns and then dyeing their fabric. The workshop concludes with a group discussion, allowing participants to share their creations and reflect on their learning experience.